Hello everyone I am sad to report the outdoor layout is no more, it was not due to it not working but due to unforeseen circumstances in my life that forced me to sell off and I am still selling off all my 2 rail O scale stuff. The locomotives have all gone to good homes and I am in the process of selling the rest of the stuff on evilbay. I am leaving this blog up so it may help others to try and build outdoors with smaller scale trains. I am not totally out of the game, I plan on going back to HO scale and maybe do the FreeMo thing or TOMA Modules when I get back on my feet, setting them up to use in the Great Outdoors, only time will tell.
I will still monitor this blog and if anyone has any questions on how I was building my layout outdoors drop me a line through this blog. As far as I know I will no longer be updating this blog except for answering questions.
2 Rail O Scale In The Great Outdoors Signing Off
Saturday, August 26, 2017
Thursday, May 4, 2017
Peco Track
Hello everyone I thought I was going to discuss my latest locomotive but change my mind because we have been discussing it over at the OGR forum Link here http://ogrforum.ogaugerr.com/topic/old-driver-identification-and-new-locomotive?reply=72383129404944097#72383129404944097
Anyway thought I would post a few pictures of my new track choice for replacing my Gargraves track, as you know in my previous post my furry brakeman was stepping on the rail and causing me some issues with my longer locomotives.
I am now in the process of taking up the Gargraves, I hate doing this because I will have to redo the top of roadbed, smooth it out before putting down the Peco track, at which I stated in an earlier post is my favorite track choice for outdoor use because of it's durability and price over Atlas, Atlas track is good but at over $18.00 for a section of flex, it is know wander newcomers have a hard time getting into the hobby unless they are very wealthy or have a very rich uncle.
I can get Peco for almost half the price. Just wish the Gargraves would have worked out, would have saved me a lot of money and aggravation. The good thing is I can still use the Gargraves when I build the layout into the shed for storage
I used Peco when I had my HO scale layout outdoors and for 2 years did not give me a bit of trouble.
Check out the pictures below.
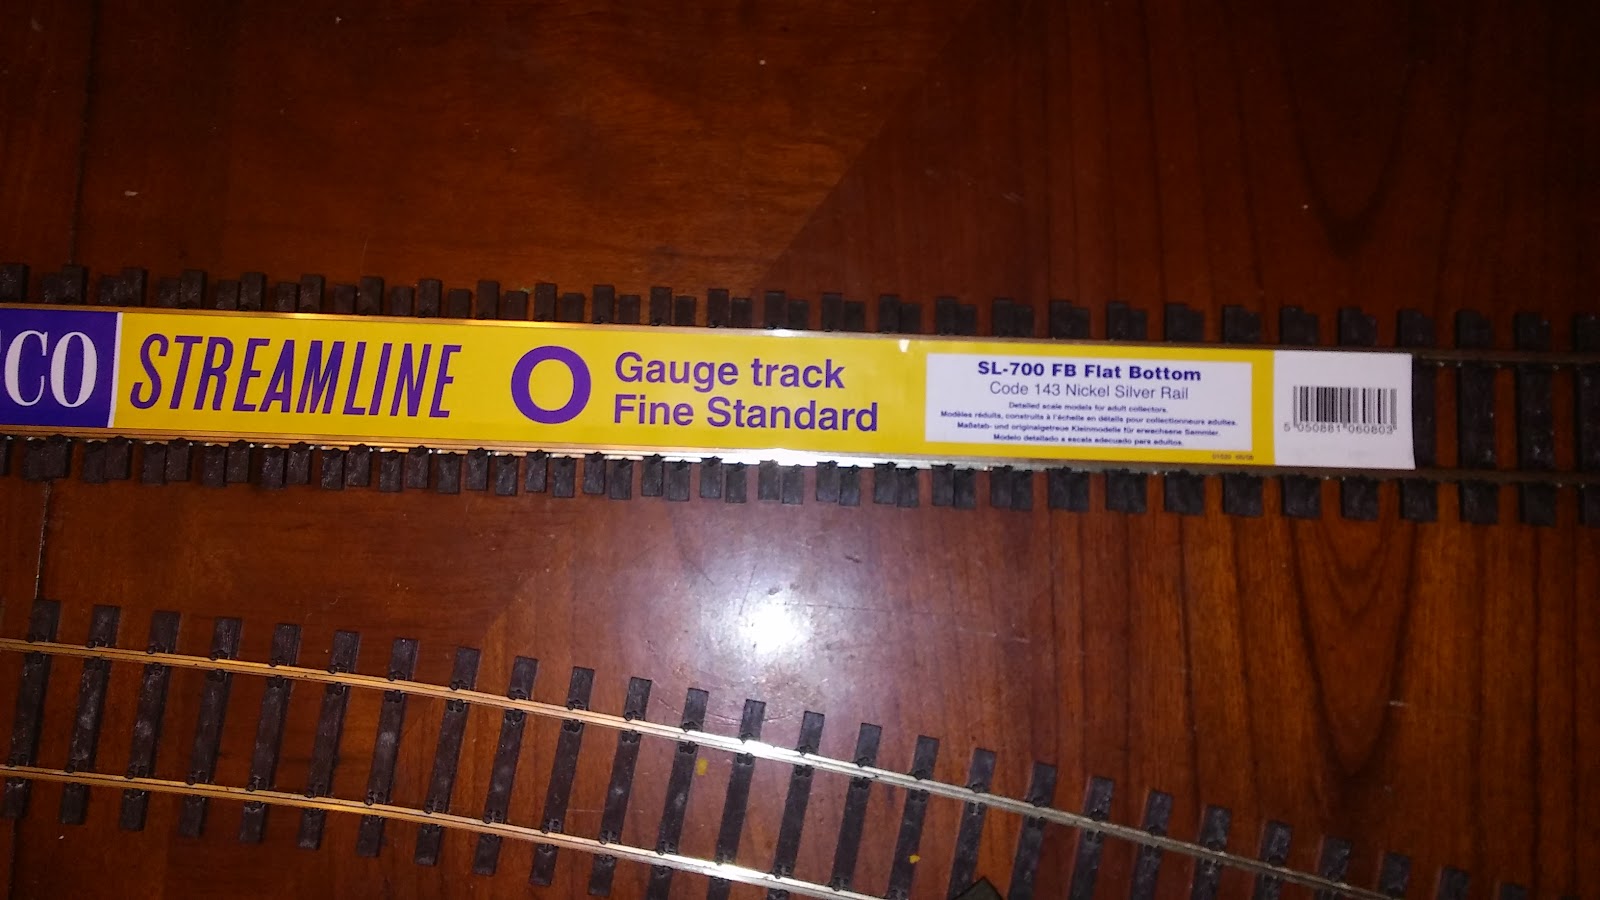 |
| Peco is code 143 so a bit smaller compared to Atlas Code 148, but I think if there is special sections I need that Atlas has, there should be no problem making it work with Peco. |
 |
| Here is a view of the track pre bent for the layout, tie spacing is a bit wide USA, but once ballasted should not be to noticeable. |
 |
| Here is the notice that the track is suitable for outdoor use |
 |
| Here is how I am going to do the buss wire. |
 |
| Here is the rail joiners, the little part that says conductive makes me laugh, of course they are conductive. |
 |
| The rail joiners come off the sprue with minimal effort unlike other rail joiners from a different manufacture that will remain nameless, especially their HO Joiners. Until Next Time. |
Saturday, April 22, 2017
Miscellanea and Photos
Hello everyone, I thought I would post some photos of the layout as I deconstruct the Gargraves track and start fitting the Peco Track in place, also a few photos of the reason I am having to go with Peco Track, my furry brakeman Trigger who as I listed in my last post was occasionally stepping on my track which was putting dips on the rail and causing issues with my longer wheelbase locomotives.


Next Post I will tell about my new locomotive acquisition and the Issues it has when compared to the prototype
Thursday, April 6, 2017
A Setback With Gargraves Track
Hello everyone sorry for the lack of recent posts, have not
had much time to work on the layout, even on my last vacation I did not really
have much time for the layout have been
busy with the family and domestic stuff.
Anyway I had somewhat of a setback on the layout, my being
cheap has caused me some trouble with using Gargraves track outdoors and it’s not
what you think, that its corrosion.
The problem is my German Shepherd, he sometimes steps on the
track and Gargraves being hollow will slightly bend even though it’s on solid
ballast.
The funny thing is I did not notice this with my little speeder or my
3450 class 4-6-4 Hudson, I noticed it when with great expectation I was going
to run my 2-10-4 on the layout, it ran great on the indoor test track but when I tried to run it
outdoors it only went a few feet and POP my 10 amp fuse blew, I searched for the cause and what I found was
with its much longer wheelbase the 2-10-4 s front pilot would dip down enough when the back half of the locomotive was above the area that dipped down and the front half would be at the bottom of the dip it caused a enough of a angle that
it would touch the rails which of course shorted things out.
Anyhow I have decided the best course of action will be to
change to a different brand of track and use the Gargraves for when I build the
indoor storage part of my build.
I have
decided to go with Peco code 143 track, so far I bought 4 pieces of their flex track.
I will have 5 days off from work starting next week so hopefully
this time I will be able to get some time to work on the layout and get the
Peco Track down for testing.
Until Next Time.
Wednesday, March 8, 2017
Looking Forward To Vacation Time
Hello all, not much to report at the moment, have not had much
time to work on the layout in the last week or so.
Did clean the leaves up around
the track and checked on my bushes I planted last fall alongside of the track,
all seem to have come through Winter just fine and have new buds, just hope we don’t have a hard
freeze between now and Spring.
I am taking some vacation
next week starting Wednesday through the following Monday, so I hope I will be
able to work some on hobby stuff and post here on any accomplishments I might have achieved.
What I want to do is run my 2-10-4 outdoors and see how
it does with its new can motor.
I also hope to realign
and ballast some of track I already have down and lay some more drainage pipe
road bed.
Stay Tuned
Sunday, February 26, 2017
Adapting A Lionel ZW 275 Watt AC Transformer To DC Power
Hello everyone I decided to make use of my old Lionel 275
watt ZW AC transformer and adapt it to use with my DC 2 rail trains until I can
decide what DCC system and decoders to use. Other people have done this and it’s
very easy to do. Below is a film of my engine running back and
forth on the Outdoor test track using the ZW plus some pictures of a wiring diagram and the buildup of the AC
to DC converter using a bridge rectifier.
Disclaimer:
This post is how I did it and is for entertainment use only.
I noticed I need to do some track realignment and some ballast work, but all in all everything seems to have made it through the winter fairly well. All I did was wiped the track down with a mixture of WD-40 and 91% rubbing alcohol, set the 3451 on the track and test ran it back and forth.
Disclaimer:
Doing electrical
work with these old transformers can be dangerous, proceed at your own risk.
I am not
responsible if you burn your house down, burn your layout to ashes, melt your favorite
train into a molten blob of metal or plastic goo,etc. etc. This post is how I did it and is for entertainment use only.
I noticed I need to do some track realignment and some ballast work, but all in all everything seems to have made it through the winter fairly well. All I did was wiped the track down with a mixture of WD-40 and 91% rubbing alcohol, set the 3451 on the track and test ran it back and forth.
 |
Here
is the Radio Shack 25 amp full-wave Bridge Rectifier glued to the inside bottom
of a plastic container.
|
 |
| Here is an overall view of the set up before wiring. (Please note the rocker switch on the lid was the wrong style of switch, I ended up replacing it with a DPDT toggle switch that I put on the lid in later photos, since I had already drilled the hole I just left the rocker switch in place rather than having a hole in the lid) |
 |
A
hole was drilled on front and back side for the wires to go through.
|
 |
| Here is wiring diagram I tried to draw up, |
 |
| Black wire on the common and the red wire on A |
 |
| Here is the wiring going from the transformer into the Bridge Rectifier |
 |
| Here is the wiring going to the DPDT Switch (Please note you are looking at the switch from the bottom instead of from the top like the drawing |
 |
| Here is another view of the wiring going to DPDT Switch. |
 |
| Here is an overhead view of the box which is how the wiring diagram is depicting. |
 |
| Here I am testing voltage on the layout next to the transformer I got a reading of 17.65 volts. |
 |
| I then went to the other end of the layout and it brought up a reading of 17.63 volts, not to bad considering that it's going through just track pins, none of the feeder wires and main buss wires are hooked up yet. I have to say I am very satisfied with the results, especially considering the track has been out in the elements since fall. |
I hope I wasn't to confusing.
Friday, February 24, 2017
Teaser Video Of The Adapting Of The Lionel ZW 275 Watt Transformer To DC Use
Sorry everyone I thought I was going to have more time to get my newest post on adapting my old Lionel 275 watt ZW Transformer to DC use done, but I have had some things come up and have not had time to get my new post together.
I should have it posted by Sunday at the latest. Anyway thought I would post a teaser video of the ZW powering my Brass Pecos River 3450 Class Santa Fe 4-6-4 Hudson.
I should have it posted by Sunday at the latest. Anyway thought I would post a teaser video of the ZW powering my Brass Pecos River 3450 Class Santa Fe 4-6-4 Hudson.
Monday, February 13, 2017
Installing A New Can Motor Part 2
I thought I would post some more photos on my can motor install. The install is a cheap and quick way of doing a re-motor. I have seen this technique used in HO scale and O scale with great success.
 |
| Overhead view of the install |
 |
| The motor I used is a Pittman 8424, I chose this motor because of recommendation from other forums we will see how it goes. I have to say so far I am impressed with it. |
 |
| I Installed a NWSL 415-6 Flywheel, I don't really know if this size of Flywheel will make much difference in the running capability of the motor but just in case. |
 |
| I used silicone to help hold the motor in place. It makes a good dampener as well. Also here is a view of the old motor. |
 |
| Here is another view of shaft connection using vacuum line. |
Everyone until next time
Sunday, February 12, 2017
Installing A New Can Motor In The 2-10-4 Part 1
Hello everyone, thought I would post about the replacing of the open frame motor on my KTM 2-10-4 with a can motor. I would call my method on doing this a quick and dirty way to installing a can motor. I have seen other people doing this with very good results. I am sorry I didn't take any photos during the installation of the motor.
Anyway I could not sleep the other night so I decided to work on the 2-10-4, was so involved in the install I forgot to take pictures, but below is a short film of the install running back and forth on the track,must say it seems to run very smooth.
there is also some pictures after the fact of the install
I will Post Part 2 Monday
Anyway I could not sleep the other night so I decided to work on the 2-10-4, was so involved in the install I forgot to take pictures, but below is a short film of the install running back and forth on the track,must say it seems to run very smooth.
there is also some pictures after the fact of the install
 |
| Here is a overall view of the install with supplies |
 |
| Tie Strap Clip, I use 2 of them in the install to set the motor on, I file down the top to help get the proper alignment of the motor and drive shafts or if needed I can add shims to the bottom for the alignment. |
 |
| This photo shows the tie strap going through the strap clip |
 |
| After installing the clips and adjusting the clips for shaft alignment I silicone the motor in place on top of the clips I let the silicone dry for 24 hours, Even without the tie strips the motor is very solid. |
Saturday, February 4, 2017
Using Track Outdoors
Hello all, in this post I am going to express my opinion I
repeat my opinion on track and the techniques I use to make track survive in an
outdoor environment.
A lot of this info in this post can apply to both 2 rail and
3 rail track.
The top 2 brands of tracks for Outdoor use would be the
newer Atlas O and PECO track. I would say Gargraves 3rd. The biggest reason for Atlas and PECO is the
plastic ties are UV Resistant. I feel UV is the biggest problem with
outdoor railroads, and a close second would be moisture; both Atlas and PECO use
Nickle Silver which is perfect for outdoor use.
Rail height for Atlas is code 148 and PECO is code 143.
As far as
Gargraves you have a choice of Stainless Steel rail or Tinplate, hands down
Stainless would be the choice to use in the outdoors. The other problem with Gargraves track is the
wooden ties; you need to treat the ties with some sort of protectant to keep
them from becoming bug food and rotting out.
As I mentioned before I have a very limited budget for this
hobby and one of my biggest pet peeves is the cost of track and turnouts. With
Atlas going between $17.00 and $20.00 per basic 3 foot section, plus a #8 or #10 turnout
going for at least $90.00 a pop, for the size of layout that I want to build I
would never be able to afford to buy trains or do landscaping. PECO is better priced at about $11.00 per 3
foot section and $55.00 for turnouts.
I like PECO the best,
I used it with my old HO Scale Outdoor layout and it stood up to the elements and
was virtually trouble free, all I would do was use a mixture of WD-40 and 97%
rubbing alcohol on a rag, wipe the track down and I was running trains, this
technique worked great for me.
There is
other brand’s out there and they may work just as well but I am not familiar with
them.
The reason I am using Gargraves and the problems of using
Gargraves.
Have I mentioned before I am cheap. I try to buy my track
used, unfortunately I usually only see
the older non UV protected Atlas track for sale in the used market, I think it
would work okay by putting a UV protectant coating on the ties before using but
I couldn’t say how well it will stand up over a long period of time. I have never seen the Code 143 PECO track in
the used market.
The biggest reason I am using Gargraves 2 rail track is you
can find it way cheaper on the used market than the other brands of track, I have been
able to score most of my track on average of between $1.00 and $2.00 a 3 foot
section. My first purchase was used
Gargraves 2 rail with the stainless rail and plastic ties; their plastic ties are UV resistant
as well, unfortunately they no longer make their 2 rail track with plastic ties
and I don’t see it on the used market very often.
I also scored about 40 feet of used the
stainless with wood ties, I have put a mix of both tie types down to see how well they do
in outdoors, so far no problems with either one.
As far as the wooden ties go,what I did was to make a vat with
PVC and plastic sheeting to fit the length of the 3 foot sections of track. I filled the
vat up with Thompson’s WaterSeal
Waterproofer Plus Clear Wood
Protector it helps prevent water damage and resists Mildew and UV damage also makes the wood less desirable to the creepy crawlies.
I take the track and set them in the vat and
let them soak completely submerged in the water seal and then soak for couple hours, I then pull the track out and hang them up on the clothesline and let them drip dry,
once they dry for a while I will wipe the top of the rails with my WD-40 and
97% alcohol mixture and install the track on the layout. I plan to spray the ties
on the layout down each season with the WaterSeal in hopes of prolonging the
life of the wooden Gargraves ties outdoors.
I am also testing tinplate Gargraves track outdoors as well,
crazy I know, but what I did was to use my Waterseal procedure with the tinplate track, but I also added WD-40 to the mixture, here is a picture of a 2 rail tinplate
track and a stainless 3 rail track setting on the table since early October of
last year, tinplate track still looks as good as the stainless.

You might be asking why on earth I would be
wasting my time testing the tinplate, well did I mention I am cheap, I scored
over a 100 feet of tinplate 2 rail track for just little over $50.00 it was too
good a deal to pass up, I figure if my experiment fails I can use the track inside
my shed when I run the line to the shed. I also might add that besides using a magnate to test weather you have stainless or tinplate track Gargraves painted a silver mark on the bottom of some of the ties on stainless track.
I was very irritated with Gargraves becuse about 9 months
ago they stop making turnouts for 2 rail O scale, their manual large radius
turnouts were reasonably priced, in some ways it may be a blessing in disguise
because let’s face it Gargraves switches are ugly, one of my alternatives is to
buy material from Ross Custom Switches and scratch build my own #8 and #10
turnouts which look more prototypical. Ross has nice blueprints of their turnouts
which I can use as guide to scratch build my own turnouts, and I will be able
to build the turnouts for a fraction of the cost.
(A little caveat here, I feel it is very important in
outdoor use to use feeder wires at every section of track weather you do it by
soldering or mechanical means) More on this in a later posting.
Until Next Time.
Tuck's Ironhorse Rambles
Sunday, January 29, 2017
More on the roadbed
Thought I would post a little more on the road bed, I hope to have better pictures on this process this spring when I continue building on the layout.
Where I left off on the process in the last post was leveling the top of the roadbed. After that's done I lightly dust the roadbed with cement and then mist water on it and I let it set and dry for a day or two, (more then anything its to help hold things in place while I am fitting track.)

Once the track fitted and setting on the roadbed where I want it I am ready for the ballast, for the ballast I am using a material called roofing granules, (the same stuff that comes from roofing shingles and that you clean out of your gutter every year, the cost is about $50.00 for a 50 pound bucket) It comes in different colors, but found that most roofing supply companies only carry light brown or white, I bought the white but plan on spray painting some black and gray paint into the bucket and mixing it around to achieve more prototypical look.
Before I put the ballast on the track I mix 1 part dry cement powder to 2 parts ballast I then pour ballast on the ties and the sides of the track, using a paint brush to clean the tops of the ties and both sides of the rail, After ballast looks the way you want it, you mist it with water and wait a few days, clean your track and it's ready to use. I almost forgot you can fairly easily super elevate your curves with this ballast.
Soon my thoughts on track and what track is best suited for outdoor use.
Where I left off on the process in the last post was leveling the top of the roadbed. After that's done I lightly dust the roadbed with cement and then mist water on it and I let it set and dry for a day or two, (more then anything its to help hold things in place while I am fitting track.)

Once the track fitted and setting on the roadbed where I want it I am ready for the ballast, for the ballast I am using a material called roofing granules, (the same stuff that comes from roofing shingles and that you clean out of your gutter every year, the cost is about $50.00 for a 50 pound bucket) It comes in different colors, but found that most roofing supply companies only carry light brown or white, I bought the white but plan on spray painting some black and gray paint into the bucket and mixing it around to achieve more prototypical look.
 |
| For Ballast |
Soon my thoughts on track and what track is best suited for outdoor use.
Until Next Time.
Saturday, January 28, 2017
More about roadbed

You can dig a shallow trench to set the hose in, then pin it
in place with the wire or you can let it just float on top of the ground then
use the wire to hold it into place every 3 to 4 feet or however many it takes
to get it to go in the direction you want. A nice thing about this hose is that
it’s flexible, you can set any radius curve you want.


The wire is pushed into the ground on each side until it
locks into the corrugated part of the hose, I try to push the wire into the
ground on both sides at least 2 feet or 0.61 meters. After this I put in lawn edging to help hold
the roadbed in place and to make lawn work easier next to the roadbed, of course
you need a lawn to worry about, maybe someday.

I then pack a layer of lava rock on both sides of the hose
it helps lock in the layer of crusher fines or dust that covers the pipe, I then
use the flat side of my shovel to tamp down, smooth out and create the slope with
the crusher fines and after that I slide a 2x4 across the top to further level
it out and as I do this I take my long leveler to check how level the top is.


By the time this picture was taken bad weather was getting ready to set in so I quickly and sloppily I might add, threw down some ballast with cement to see how it was going to survive the Winter, I will clean it up this spring. So far it has done very well.
Next time I will continue my blog on the roadbed and maybe some other stuff as well.
Wednesday, January 25, 2017
3451 in Wichita Kansas 1940
Thought I would share a cool photo I found of 3451 back in 1940 setting at the Wichita Union Station and my O Scale Pecos River Brass version of it. Only 1 locomotive of this class was spared, it now resides at the Rail Giants Train Museum in Pomona California here is a link to the Museum and some cool history on this class of locomotive. http://www.railgiants.org/atchison-topeka.htm
 |
| This photo is from the Denver Public Library, Otto Perry RR Collection |

Wednesday, January 18, 2017
Here is some pictures of the locomotives I have so far for my O scale Outdoor / Garden railroad.
 |
This photo shows both my brass steam locomotives, the
unpainted brass is a KTM 5011 class Santa Fe 2-10-4 WHAT A BEAST! The painted
locomotive is a Pecos River Brass 4-6-4 3450 class Hudson. I think both of them
will look awesome pulling freight and passenger cars outdoors.
|
 |
Here is an over the tender shot of the 2-10-4 showing how
massive this locomotive really is. I will be documenting installing the can
motor, DCC, detailing and other cool stuff.
|
 |
| Another View of the 2-10-4 |
 |
Here is a view of the 4-6-4, I absolutely love this locomotive
|
 |
Here is the only diesel I have so far on the roster. It is a
MTH 3-rail DL-109, I plan to convert it to 2 rail and do extensive
modifications to the body to make it more prototypical for the lone Santa Fe DL
-107.
Until Next Time
|
Saturday, January 14, 2017
Fitting Track
Here is a few photos of when I was bending and fitting track on the roadbed.
 |
| Passenger car in use as a test vehicle. |
 |
| In need of some TLC. |
 |
| Just a few days before cold weather |
Subscribe to:
Posts (Atom)